Skillhive user guide – all guides
All published Skillhive user guides on one page.
Skillhive User Guide
Here you will find general Skillhive instructions for the most important use cases, for both regular users and admin users.
Registration and login
Registration to the Skillhive Service
Do you want to sign in or get an account?
- I already have a Skillhive account and sign in by email: see the email code login instructions.
- I use a staff SSO or AD account: open your organization's Skillhive and select the staff login option.
- I need an account: follow the instructions in your invitation. If you do not have an invitation, ask your organization's Admin how to get access.
Registration
Available registration methods depend on your organization's Skillhive settings.
1. Invitation-based registration
Admins define in user settings who can send invitations. Invitation rights can be:
- Restricted to Admins only
- Granted to all users
- Disabled entirely
Invitations may also be restricted to the organization's email domain.
Invitations can be sent from two places:
- Experts page: select Invite Experts to send a general invitation.
- A swarm: send an invitation that includes the swarm's title and description.
The invitation email contains a personal link to the registration page. Follow the instructions in the invitation to complete your registration.
Admins can edit the general invitation message in:
Admin Panel → Language → New User Invitation Messages
2. Azure AD / Entra ID authentication
If Azure AD / Entra ID authentication is enabled:
- You register and sign in using your organization's AD credentials.
- You do not need a separate Skillhive password.
- You use the same credentials as for other company systems.
Personal data, such as your name, unit, location and email address, may be transferred automatically when you sign in.
3. Administrator-based user creation
Admins can add users directly via the Admin Panel and assign their user roles.
Important: adding a user directly creates their profile immediately. A valid legal basis or authorization under applicable data protection regulations must exist before creating the profile.
If no such basis exists, an invitation should be sent instead, so that the profile is created only after acceptance.
Signing in
Open your organization's Skillhive login page, for example https://company.skillhive.com. Your login method depends on your account.
With an email code (OTP)
If you sign in with a Skillhive account, enter the email address associated with your account and request a login code. Enter the six-digit, one-time code sent to your email to sign in. You do not need a Skillhive password.
This method may also apply to external experts in organizations that use SSO.
For the full steps and troubleshooting, see Passwordless login – email code (OTP).
You need an existing account. Requesting a login code does not create one.
With your organization's SSO or AD account
Select the staff login option and continue to your organization's sign-in process. The move to email codes does not change this login method.
If Azure AD / Entra ID or Virtu integration is enabled and you are already signed in to another company system, single sign-on (SSO) allows you to access Skillhive without signing in separately.
Using more than one Skillhive environment? You need an account in each environment. Open the correct organization's Skillhive address when signing in.
Troubleshooting
My invitation email has not arrived
Check your spam folder. If you still cannot find the invitation, contact the person who invited you or your organization's Admin.
My login code has not arrived or is not accepted
Check that you entered the email address associated with your Skillhive account and opened the correct organization's Skillhive environment. If the email has not arrived, also check your spam folder.
See the email code troubleshooting instructions for the next steps.
I have forgotten my password
If you sign in with an email code, you do not need to remember or reset a Skillhive password. Request a login code on your organization's login page.
If you use an SSO or AD account, your organization manages the account and password through its own identity system.
Support
If you cannot resolve the issue, contact your organization's Admin. If you do not know who the Admin is, contact Skillhive Support: info@intunex.fi.
Tell support which organization's Skillhive you are trying to access, what you were doing and what message the page displays. Do not send passwords or login codes.
Passwordless login – email code (OTP)
Sign in to Skillhive with a six-digit code sent to your email. Follow the login steps and find help with common problems.
You can sign in to Skillhive with a six-digit, one-time code (OTP) sent to your email. There is no password to remember or reset.
Which login method do you use?
Staff SSO or AD account: select the staff login option and continue to your organisation's sign-in process. You do not need a Skillhive email code. This login method remains unchanged.
Email address and a Skillhive account: follow the steps below. This may also apply to external experts.
To sign in with an email code, you need a user account in the relevant Skillhive environment and access to the email inbox associated with that account.
How to sign in with an email code
Open your organisation's Skillhive address. Use the address provided by your organisation, for example
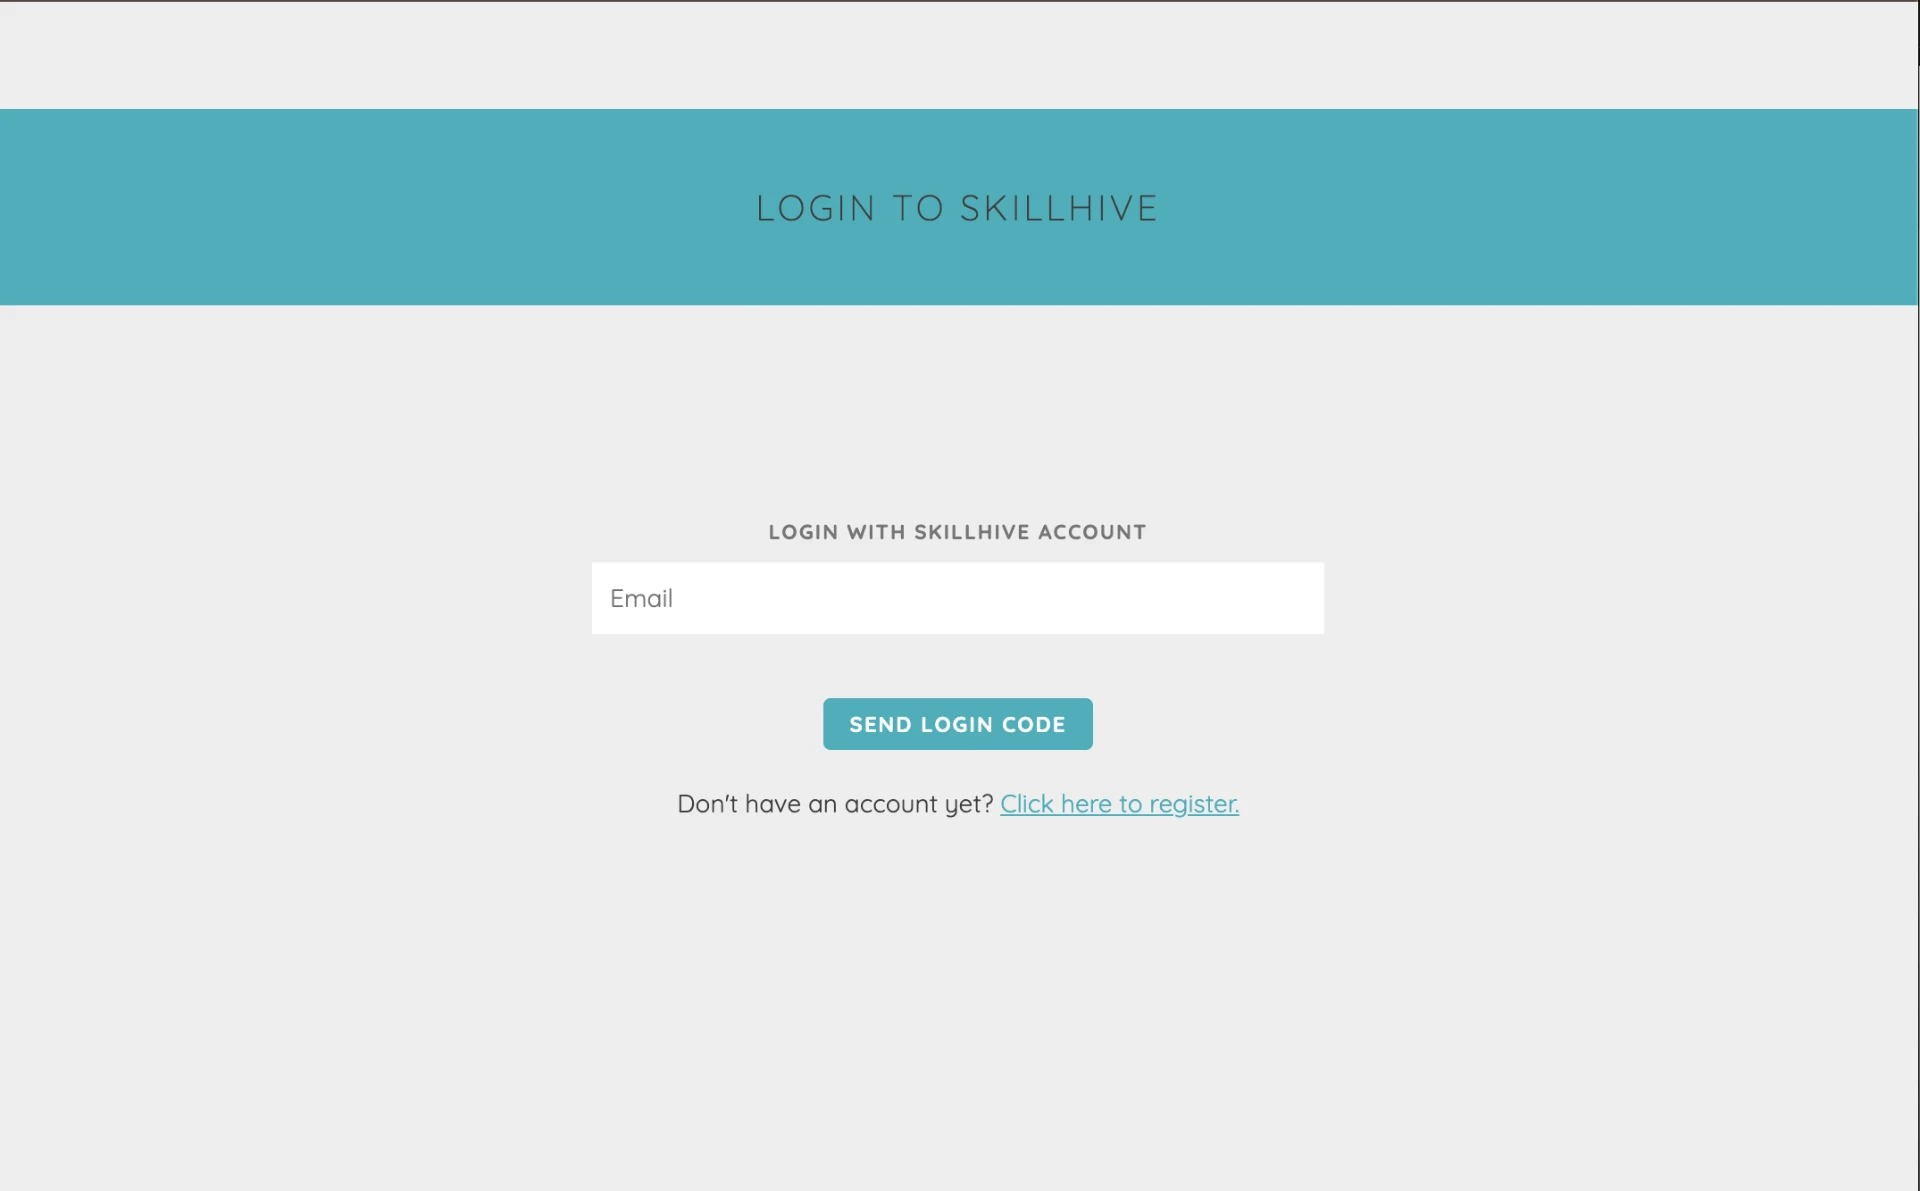
https://company.skillhive.com. Replace company in this example with your organisation's address.Choose to sign in with a Skillhive account. If the page has a separate staff login option, open the option for users who sign in by email. It may be labelled as an external expert login. In some environments, the email field is shown directly.
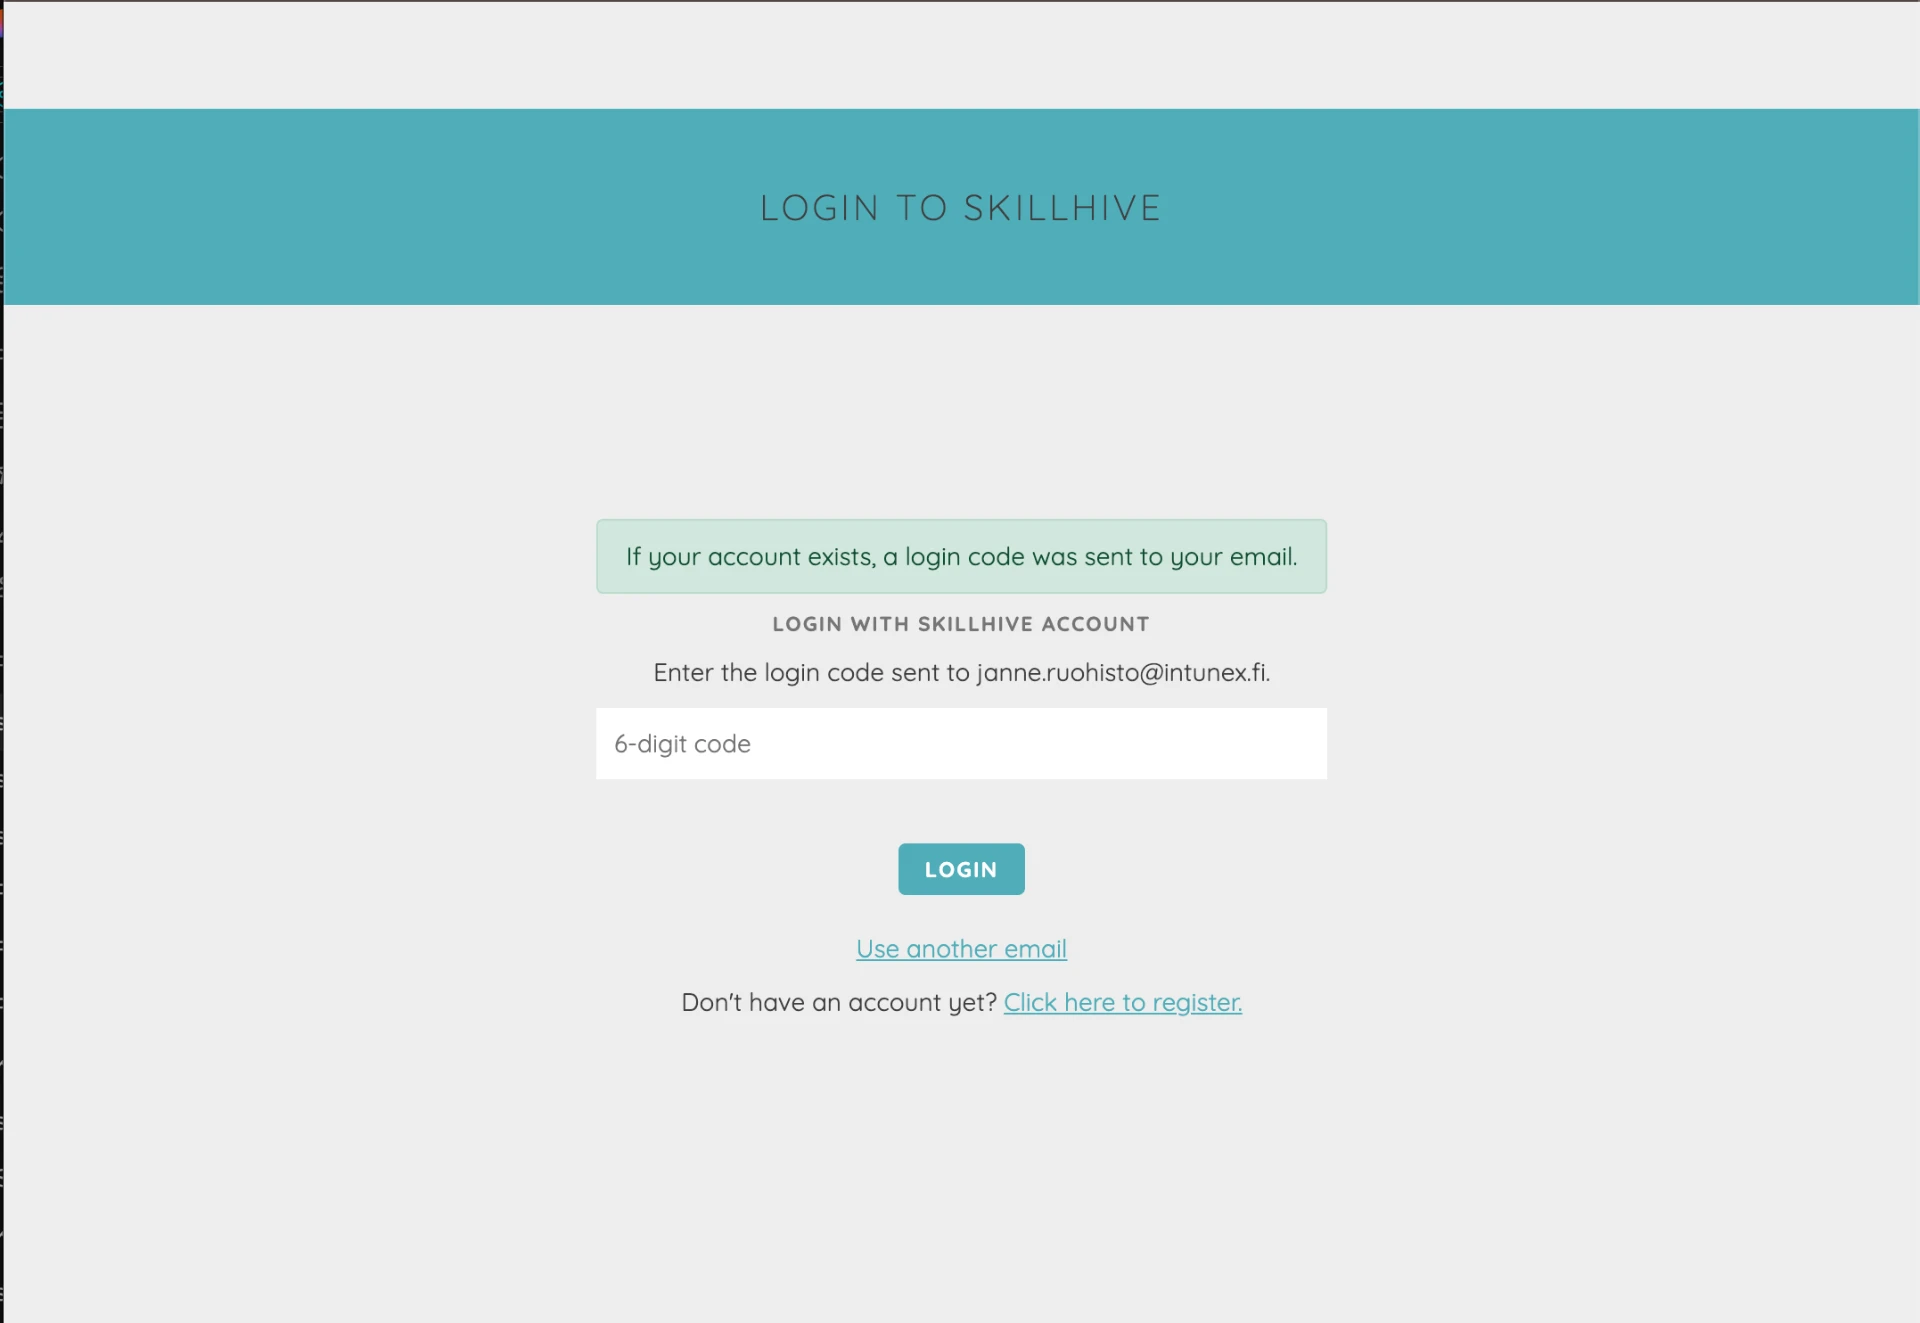
Enter the email address associated with your Skillhive account and select Send login code. The page displays a code field and a message saying that a login code is sent if an account exists for that address.
Open your email and copy the six-digit code from the message. Keep the Skillhive login page open.
Return to Skillhive, enter the code in the 6-digit code field and select Login. When the code is accepted, you are signed in to Skillhive.
Your login code is personal. Do not share it with anyone.
If you cannot sign in
The login code has not arrived
Check your spam folder and allow a little time for the message to arrive.
Check that you entered the email address associated with this Skillhive account and opened the correct organisation's Skillhive environment.
If you mistyped the address, select Use another email, correct the address and request a code again.
If the code still does not arrive, or you are unsure whether you have an account, contact your organisation's Skillhive administrator.
The message about sending a code does not confirm that an account exists. Requesting a code does not create a user account.
The login code is not accepted
Check that you entered all six digits correctly and are using the code you received for this login. If you still cannot sign in, select Use another email to return to the email field and request a new code.
If the new code does not work either, contact your organisation's Skillhive administrator or Skillhive support. Contact details are at the end of this guide.
I cannot access my account's email inbox
You need access to the email inbox associated with your account to receive the code. Contact your organisation's Skillhive administrator for help.
I do not have a Skillhive account yet
An email code is used to sign in to an existing account. If you have received a registration invitation, follow its instructions first. Otherwise, ask your organisation's Skillhive administrator how to get access. Registration options depend on your organisation's settings.
The login page still asks for a password
This guide covers signing in with an email code. If your environment's login page still asks for a password, follow the instructions on that page. Your organisation's Skillhive administrator can confirm which login method applies to you.
Need more help?
Contact your organisation's Skillhive administrator first. If you do not know who the administrator is, or the problem remains unresolved, contact Skillhive support : info@intunex.fi.
Tell support which organisation's Skillhive you are trying to access, at which step the problem occurs and what message the page displays. Do not send your login code to support.
Inviting new users
Inviting new users
Invitation Settings
Admins can define who is allowed to invite new users and from which email addresses invitations may be sent.
Settings are available in:
Admin Panel → User Settings
Available configuration options:
- Invitations can be sent from any email address
- Invitations can be sent only from the organization’s email domain
- Only Admins can send invitations
- Invitations are disabled
Note on AD / Entra Authentication
When AD / Entra authentication is enabled, users log in via the organization-specific login page.
In this case, users can access the service simply by being provided with the login link, and the invitation feature may not be required (setting: invitations disabled).
If external users need to be granted access (e.g., EXT role), Admins can add users to the desired role using any email address.
Inviting New Users
If invitations are enabled, new users can be invited:
- From the Experts page using the “Invite Experts” function
- Directly to a specific swarm
Invitations from the Experts Page
When invited from the Experts page, the user receives a general invitation message.
The content of this message can be edited by Admins.
Invitations from a Swarm
If the invitation is sent from a swarm:
- The email subject line contains the swarm title
- The email content is based on the swarm description
Only the swarm owner and Admins can send invitations to restricted swarms.
Email Domain Restrictions
Administrative settings can require that invited users have an email address matching the organization’s approved domain.
Possible Delivery Issues
Invitation emails may occasionally be filtered as spam by email clients.
Users should be advised to check their spam folder if the invitation email is not visible.
Adding Users Without Invitation
If an invitation email is not successfully delivered, an Admin may add the user directly via the Admin Panel.
In this case, the Admin can also assign the appropriate user role.
Please note:
When a user is added directly by an Admin, the user profile is created immediately.
A valid legal basis or authorization under applicable data protection regulations must exist before adding a user.
Permissions
Permission levels and rights
User Roles and Permissions
Skillhive provides six user roles to manage and restrict permissions:
- Admin
- Regular User
- HRD
- External Expert (EXT)
- EXT Mentor
- EXT+
In addition, Intunex has system-level administrator rights (Superadmin).
Admins can manage user roles and permissions in:
Admin Panel → User Management → Experts
Permissions by Role
Level 1: Admin
Profile Information
- Can view all user profiles.
- Can edit profile information (excluding skill assessments, email address, and password).
Skills
- Can view all skills and all assessments.
- Can add, edit, merge (find & replace), and remove skills from the system.
- Has access to reports covering all skills and skill assessments.
Swarms
- Defines available swarm types and creation rights.
- Can view open swarms, self-created swarms, and restricted swarms where they are members.
- Can edit all swarm information, including the “official” label.
- Cannot view the content of restricted swarms (e.g., development discussions) unless a member.
- Has access to statistical/quantitative data from all swarms, including restricted ones, without access to detailed text content or discussions.
Invitations
- Can invite and add new users to the system.
System Settings
- Can modify both personal and global system settings.
Level 2: Regular User
Profile Information
- Can view all user profiles within the organization.
- Can edit only their own profile.
Skills
- Can view all skills and assessments.
- Can add skills to their own profile and edit their own assessments.
- Can edit skill descriptions.
- As a manager, has access to reports for their own team.
Swarms
- Can view open swarms and restricted swarms where they are members.
- Can edit their own content.
- As swarm owner, can edit swarm information (excluding the “official” label).
Invitations
- Can invite new users according to system settings.
- Cannot directly add users to the system.
System Settings
- Can modify only personal settings.
Level 3: HRD
- Has the same rights as a Regular User.
- The HRD role allows differentiation of swarm types available specifically to HRD users.
- For example, training creation rights can be restricted to HRD users without granting Admin rights.
Level 4: External Expert (EXT)
Profile Information
- Can view basic profile information of other users (name, photo, contact details).
- Can view full profiles only when acting as the user’s supervisor.
- Cannot view other EXT/EXT+ profiles unless members of the same swarm.
Skills
- Can view all skills and their own assessments.
- Cannot view other users’ assessments.
- Can add skills and edit their own assessments.
Swarms
- Can view the title, description, and skills of open swarms and swarms they are invited to.
- Can view full details of swarms where they are members.
- Can edit their own content.
- As swarm owner, can edit swarm information (excluding the “official” label).
Invitations
- Cannot invite or add new users.
System Settings
- Can modify only personal settings.
Level 5: EXT Mentor
Profile Information
- Can view basic profile information of other users.
- Can view full profiles when acting as the user’s supervisor.
- Cannot view EXT/EXT+ profiles unless members of the same swarm.
Skills
- Can view all skills and their own assessments.
- Can view other users’ assessments only when acting as supervisor.
- Can add skills and edit their own assessments.
Swarms
- Can view open swarms and restricted swarms where they are members.
- Can edit their own content.
- As swarm owner, can edit swarm information (excluding the “official” label).
Invitations
- Can invite users according to system settings.
System Settings
- Can modify only personal settings.
Level 6: EXT+
Profile Information
- Can view only their own profile.
- Can edit their own information.
Skills
- Can view all skills and descriptions.
- Can view only their own assessments.
- Can add skills and edit their own assessments.
Swarms
- Cannot view swarms.
- Cannot create or join swarms.
Invitations
- Cannot invite or add users.
System Settings
- Can modify only personal settings.
Supervisors
Users may have a supervisor relationship assigned, granting supervisor-specific permissions.
Supervisors have access to a “My Team” view, where they can:
- View team members
- Download reports
- Process training applications requiring approval
A supervisor is assigned in the profile under:
Supervisors → Edit (🖊️) → Search Expert → Add
By default, users can assign their own supervisor but cannot assign subordinates.
Admins can assign supervisor relationships for other users.
Supervisor information can also be imported automatically via integration (e.g., Azure AD / Entra ID). In that case, manual editing can be disabled.
Owners
Users may also have ownership rights for swarms (e.g., training pages, development discussions).
Owners can:
- Edit swarm information
- Manage swarm visibility
Further details about swarm owners and members are available in the Swarms section.
Profile creation
When a user registers or is added to the service, they are guided through a step-by-step onboarding flow to create their profile. The user profile presents personal information, skills, and experience in a clear format. The profile can also serve as a basis for a CV (PDF download available if enabled in organization settings).
Profile Creation Steps (Default)
1. Registration and First Login
Upon first login, a welcome page is displayed.
This page explains the purpose of the service and what is expected from the user.
Admins can edit the welcome message in the Admin Panel (Admin Panel → Language).
A video introduction can also be embedded on this page.
2. Basic Profile Information
Users are guided to enter basic information such as:
- name
- job title
- contact details
- unit and location
- supervisor
- profile summary
Some fields may be pre-filled if an integration with the organization’s other systems is enabled.
Name and profile picture can also be imported from LinkedIn.
Admins can define selectable options for job titles, units, and locations.
3. Supervisor Selection
By default, users are asked to select their supervisor.
With system integrations, this information can be imported automatically.
4. Selecting Competency Areas and Skills
Users select skills from competency areas defined by administrators.
Users may also add new skills. The system suggests existing skills from the shared skill taxonomy to maintain consistency.
If needed, completely new skills can still be added.
5. Skill Assessment
Selected skills are evaluated based on:
- competence level (stars)
- interest level (hearts)
Each level includes a textual description, which can be edited by admins.
By default, assessed skills are visible to other users within the organization (regular user level).
Users are encouraged to assess the skills they wish to present.
The more comprehensively skills are assessed, the easier it becomes to discover and share expertise.
6. Completing the Profile
The profile can be supplemented with:
- education and certifications
- work history (projects, employers, events)
- experience linked to skills
- recommendations and acknowledgements from other users
- swarm memberships
The Interested in Job Rotation field is optional.
This information is visible only to Admins.
A profile picture can be uploaded from the upper-right corner of the profile page.
Images are resized to 200x200 px.
Profile pictures are displayed in directories, comments, and swarm member lists.
Customization
The profile creation steps can be customized per customer organization (for example, by removing unnecessary steps).
Admins can edit instructional texts for each step in the Admin Panel:
Admin Panel → Language → (e.g. Welcome Message / Competency Selection / Skill Assessment).
Admins can also control:
- which fields are displayed in profiles
- whether profiles can be downloaded as PDF CVs
Profile visibility
Skillhive is built on transparent expertise within the organization. By default, user profiles are visible internally according to role-based access levels. The visibility of profile information and skills can be managed through user settings and permission levels.
User Roles and Profile Visibility
The customer has six user roles available:
- Admin (Pääkäyttäjä)
- Regular User (Tavallinen käyttäjä)
- HRD (equivalent to Regular User rights, but allows restriction of swarm creation rights between these roles)
- External Expert (EXT)
- EXT+
- EXT Mentor
In addition, Intunex has system-level administrator rights (superadmin).
Profile Visibility
All profile information (with the exception of job rotation interest) is visible within the user’s own organization to the user themselves as well as to all Regular Users and Admins.
Users with Regular User rights are able to view the profiles of all other users within the same organization.
Profile information is never visible outside the user’s own organization.
Job rotation information is visible only to the user themselves and to Admins.
External Expert Permissions
EXT users can view only basic information from other users’ profiles:
- name
- photo
- contact details
- short description
They do not have access to skill assessments, CV details, or other extended profile information.
EXT+ users can view only their own profile information.
EXT Mentor users can view detailed profile information only when acting as the user’s supervisor, mentor, or coach.
Further details are available in the section User Roles and Permissions.
Personal Responsibility
Users are responsible for:
- Their own skill self-assessments
- Voluntary profile descriptions
Only work-related information should be added.
Skills and areas of expertise
Skillhive makes skills and potential visible. It is a living, visual skills map that supports collaboration and continuous learning across the organization.
Skills
In Skillhive, individual competencies are referred to as skills.
A skill can represent:
- A technical ability (e.g., Python, Power BI)
- A methodology (e.g., Scrum)
- A tool (e.g., SAP)
- A soft skill (e.g., facilitation)
Skills can be attached to:
- User profiles
- Swarms (e.g., training sessions, projects)
When adding a skill to a profile, users assess:
- Their competence level
- Their interest level
Skill Library
Admins may create and maintain an organizational skill library.
The system:
- Recognizes predefined terms as skills
- Suggests them proactively (autocomplete) when users search or add skills
This promotes consistent terminology.
Users may still add skills outside the official library. In such cases:
- The skill appears on the user’s profile
- It is searchable
- It does not alter or interfere with the official skill taxonomy
Organizations are encouraged to define shared principles for adding new skills.
Naming Guidelines
- Use short and clear terms
- Avoid combining multiple skills into one
- For broader categories, use format:
- Microsoft: ADFS
Areas of Expertise
Areas of expertise are broader competency categories containing multiple related skills.
Typical groupings include:
- Strategic/core competencies
- Role- or team-based competencies
- Specialized competencies (e.g., leadership, industry knowledge, languages)
A single skill may belong to multiple areas.
Areas of expertise:
- Are selectable during profile creation
- Can be edited later from the profile
Since an area of expertise is a swarm type, hierarchical structures can be created using sub-swarms.
Competency Assessments
In addition to areas of expertise, organizations may create specific competency assessments, such as:
- Sales competency
- AI competency
- Project-based assessments
These have a separate view but function similarly to areas of expertise.
Skill Assessment Levels
Skills are assessed on two axes:
- Competence level (stars)
- Interest level (hearts)
Assessment levels include:
- 5 levels
- Half-level increments (10 visual levels total)
Level descriptions can be customized per organization.
Several predefined models are available.
Managing Skills (Admin)
Admins can:
- Add skills
- Edit skill names and descriptions
- Merge duplicate skills (Find & Replace)
- Remove skills from the system
- Access skill-related reports and statistics
When merging skills:
- Assessments are preserved
- Duplicate terminology is unified
Removing Skills
From a Profile
Users remove a skill by removing its assessment:
- Click the minus button
- Each click removes half a star
- When all stars are removed, the skill disappears from the profile
From the Entire System
Only Admins can delete a skill system-wide:
- Open the skill page
- Select “Edit”
- Select “Delete this skill”
The system confirms where the skill is used before deletion.
Once deleted:
- The skill and all related assessments are removed
- The same skill can be reintroduced later
Skills mappings and areas of expertise
A skills mapping is a flexible tool that any authorised user can use to map selected skills quickly, for example for a team, a project or a new theme such as AI skills. An area of expertise, by contrast, is a permanent set of skills defined jointly by the organisation and offered to every user already during profile creation.
For: administrators, HR and managers
Skills mapping or area of expertise?
| Area of expertise | Skills mapping | |
|---|---|---|
| Purpose | Strategic, shared or role-specific skills that deserve long-term attention | A more detailed or quick mapping for a specific need: a team, a project, a new theme |
| Who typically defines it | Management and HR together with experts | A team, a manager, HR or a project |
| Where the user encounters it | In the new user tutorial and in their own profile (Edit areas of expertise and skills) | On the Skills mappings page, through an invitation or by joining |
| Lifecycle | Permanent, updated rarely | Flexible: easy to create, edit, close and delete |
Both work the same way technically: they share the same assessment, discussion and chart views. The organisation can rename them, for example areas of expertise can be called roles.
The same skill can belong to many areas of expertise and skills mappings. The assessment is made for the skill, not for the mapping, so users never need to assess the same skill twice. A team's own detailed mapping therefore does not break the organisation's shared areas of expertise.
Who can create skills mappings?
The administrator decides this under Admin panel → Swarm settings. There, each user group (regular users, external experts, mentors, HRD and administrators) is given the swarm types it may create.
- The setting only applies to creating new mappings. Without creation rights, users can still view and complete mappings that are visible to them.
- When the swarm type is enabled, Skills mappings appears in the left-hand menu.
- A typical choice: creation rights for HR and managers, or for everyone if teams are expected to run their own mappings.
Who can see a mapping?
The Skills mappings page shows the latest mappings that are visible to you.
- An internal mapping is visible to all staff.
- An invite-only mapping has a lock icon and is visible only to invitees, members and owners.
- An open mapping is also visible to external experts (EXT). EXT+ users never see mappings. They can be given skills to assess through areas of expertise.
No mapping is ever visible outside your organisation's own Skillhive environment.
Related guides
Building a skills mapping
Create a mapping from the Skills mappings page (Create new or a template) and add skills to it with the Add skill field in the right-hand column. Then invite the participants. Required levels and other advanced settings are optional.
For: mapping owners and administrators
Steps
- Create the mapping in one of these ways:
- The + button on the home page (Create new): choose Skills mapping from the list. The list only shows types you are allowed to create.
- Skills mappings page: choose Skills mappings in the left-hand menu and then Create new in the bottom right corner.
- From a template: open the templates at the top of the Skills mappings page (they may be hidden, so expand them), choose a template and Use this template. Confirm the copy. The template's discussion topics, task lists and skills are copied into the new mapping.
- If you are a manager, choose the creation method: one shared mapping for all invitees, or a separate mapping for each team member you select.
- Give a title and a description. In the description, briefly explain why the mapping is being done and when it should be completed.
- Check the visibility: internal, invite-only or open. Visibility can no longer be changed once the mapping has comments.
- Add skills with the Add skill field in the right-hand column. The field suggests existing skills from the first letter. Always choose an existing skill when possible, and add a new one only if no suitable skill exists.
- Invite participants with the Invite experts button. See Swarm owners and members.
Administrators can create ready-made templates for the organisation, for example for team, role or strategic skills mappings. Template visibility can be restricted, for example to managers only. Keep the number of templates small so the right one is easy to find. See Templates.
A skill can be removed from the mapping with the cross after the skill tag. The change appears in the middle column when you refresh the page.
A good mapping
- At most about 30 skills in one mapping. If there are more, split them into several mappings or areas of expertise.
- Concrete skills. A skill must keep its meaning in different contexts, because the same skill is also linked to trainings, projects and certificates. Avoid broad, vague bundles.
- A naming convention helps structure detailed skills: a prefix and a colon (e.g. Programming language: JavaScript) or a clarification in brackets.
- A description on the skill page. Click the skill name to see its description. The description is edited on the skill's own page and supports basic formatting (bold, italics, lists). A good description states concisely what the skill means in practical work.
- Use AI. AI helps a lot in defining skills and writing descriptions when you tell it your organisation's industry. Have an expert review the result before saving.
Skills without a rating scale
Not everything should be measured by skill and interest level. For example, a strength such as courage to try new technology is not rated with stars: it either describes you or it does not. For such skills you can choose to have no scale:
- Open the skill's own page and choose Edit this skill.
- Under Rating scale, choose either Stars and hearts (default) or No scale.
Without a scale, a skill is either added to the user's profile or not. The same approach works for language proficiency levels, for example: each level (e.g. English: fluent) is its own skill without a scale, and users choose their own.
Skillhive can also use the Voimakehä strengths vocabulary, which lets you view people through their strengths as well as their skills. Deployment and licensing are agreed separately.
Required levels (optional)
A required level states what skill level the skill requires in this mapping, for example for a team, a role or a task.
- Choose Edit requirements in the right-hand column.
- Click the required level for the skill with the stars.
- The required level is shown in the chart as a line that shows how many people are above or below the level.
If no levels are set, the default is the full level. It is not shown in the chart, but it appears in the report. We recommend required levels only for permanent and strategic skills that are followed over a long time. In a quick mapping, the quadrant shows strengths and development areas without them.
Other settings (Edit swarm details)
- Time: start time (by default the moment of creation), end time or Mark as ongoing. The mapping can be closed at any time by clicking In progress.
- Target group: target the mapping by location, unit, job title or manager. This makes the mapping findable with search filters. Usually needed only in large organisations.
- Content linked to the whole: link sub-mappings or other swarms to the mapping by typing their name. Linked content appears as a carousel below the description. Useful in large entities, but it is better to start light.
- Discussion: if the mapping is created from a template, comments pinned to the template are copied as ready-made discussion topics. This way the mapping can be defined through a guided discussion in Skillhive.
Changing the swarm type: the owner can change the swarm type later, for example from a skills mapping to an area of expertise, but only to a type they are allowed to create. No data is lost, but some of it may appear differently in the new type or not be shown.
General swarm functions (following, copying, owners, sharing by email, discussion) work as in all swarms. See Swarms.
Related guides
Assessing your skills
Join the mapping and rate each skill twice: your skill level with stars and your interest with hearts. Ratings are saved immediately and also appear in your profile.
For: all users
Steps
- Open the mapping from the invitation link or from the Skills mappings page.
- If you are not yet a member, choose Join. Only as a member are you included in the mapping's charts and reports.
- Open the Assess your skills tab, which opens first by default. Skills are in alphabetical order, and a long list is split into pages.
- Rate each skill:
- Stars = skill level. Half stars are possible.
- Hearts = interest, meaning the desire to develop and use the skill.
- If you are unsure what a skill means, click its name. The description opens, and Open skill takes you to the skill's own page.
What do the stars mean?
Your organisation can define the levels itself. The most common model is this:
| Stars | Level |
|---|---|
| 1 | I am a beginner |
| 2 | I know a little |
| 3 | I know it fairly well |
| 4 | I know it very well |
| 5 | I am an experienced expert |
Rate what you can do now, not how many years you have done it. Skills fade and develop at different speeds, so years are not a reliable measure.
Interest is as important as skill. Skillhive does not look for gaps but for potential: low skill and high interest show exactly where learning is worth directing.
Who can see my ratings?
By default, your ratings are visible to your organisation's regular users and administrators, but never outside the organisation. The organisation can restrict visibility, for example so that only you, your manager and administrators see the ratings. See Profile visibility.
Frequently asked questions
How do I remove a skill from myself?
The easiest way is one of these:
- On the skill's own page: open the skill and remove it from yourself with one button.
- In your own profile: choose Edit areas of expertise and skills and clear the selection.
In the assessment view, the minus button lowers the rating half a star at a time, and the skill is removed only when both skill and interest are at zero. That is the slower way.
Do I have to rate the same skill again in another mapping?
No. The rating belongs to the skill, so it appears ready in every mapping that contains the same skill. You can update it at any time.
Why can't some skill be rated with stars?
The skill has been set to have no rating scale. In that case the skill is either in your profile or not, for example a strength or a language proficiency level. Add it to yourself from the skill's page.
Related guides
Viewing results and reports
You see the mapping's results as a quadrant on the Charts tab. As a table you get them with the Select report function, where you can also download an Excel file. The skills of the whole organisation or your own team are viewed on the Experts page and in the My team view.
For: charts for everyone with access to the mapping, reports for owners and administrators. External experts (EXT, EXT+) do not see the charts.
Charts tab: the quadrant
- The horizontal axis is interest and the vertical axis is skill.
- Each skill is a bubble. The bubble's position is the average of the mapping members' ratings.
- Only the mapping's members are included. Owners who are not members are not shown in the chart.
- Click a bubble to see the spread, meaning the position of each rater. If several people are in the same spot, a number is shown. Clicking it drills down to individual profiles.
- If a required level has been set for the skill, it is shown as a horizontal line. At a glance you see how many are above the level and how many below.
How to read the quadrant
| Position | What it tells | What to do |
|---|---|---|
| Top right: strong skill, strong interest | Strengths | Use and share the expertise, for example through mentoring |
| Bottom right: low skill, strong interest | Development potential: the will to learn is there | Direct training, learning and work opportunities here. Investment here pays off best |
| Top left: strong skill, low interest | Fading expertise | If the skill is still important, find out what would make maintaining it motivating again |
| Bottom left: low skill, low interest | Blind spot | Consider other means: recruitment, partnerships or outsourced services |
Mapping report
Choose Select report in the right-hand column. Each report first shows a preview, and it can be downloaded as an Excel file.
| Report | Content |
|---|---|
| Skills | Each member's skill and interest rating per skill, and the required level |
| Members | Name, email, job title, unit, location, role (participant, owner, invited) and join date |
| Discussions | The mapping's discussions: date, author and comments |
| Task lists | The mapping's task lists, if they have been used |
These reports only cover this mapping's skills and members. Broader reports are found here:
- Managers: the My team view
- Administrators: the More information section in the right-hand column of the home page, with comprehensive reports on all skills data
- Your own systems: through Skillhive's REST API, skills data can be retrieved into your own systems and combined with, for example, business data. Ask Skillhive support about the API.
Good to know: the charts show the current state of skills. If you want to follow change over time, save the report regularly, for example a few times a year, or retrieve the data through the API and compare it.
The whole organisation's skills: the Experts page
- Open Experts.
- Search for one or more skills by keyword, or choose a ready-made area of expertise or mapping. All its skills are then included in the search.
- If needed, narrow the target group by unit, location, job title or manager. By default the search covers the whole organisation.
- Switch the view under Show: from list to chart (bubble icon).
Only mappings visible to you can be selected.
Your own team's skills (managers)
- Open My team in the left-hand menu.
- Go to the Skills tab.
- Choose an area of expertise or a mapping to see your team's skills in the same quadrant.
No search is needed, because your team is already filtered.
Related guides
- Reports and analytics
- Building a skills mapping (required levels)
Guide – how to run a skills mapping in your organisation
You can do a quick mapping in Skillhive in an hour: list the skills, invite people, and the results are ready once the ratings are done. A strategic mapping typically takes 2–4 weeks. It starts from a need, not from a list of skills.
For: management, HR and the project planning the mapping
Quick mapping
When you already know what you want to map (e.g. a team's skills or a new theme), create a mapping, add skills and invite people. See Building a skills mapping and Assessing your skills.
Strategic mapping step by step
- Define the need. Who are the skills being mapped for, and what problem is being solved? Typical needs include:
- a situational picture for management to support decisions
- targeting learning and training
- sharing expertise
- finding the right people for sales, projects or as trainers
- internal mobility and job rotation
- Translate strategy into skills. Management discusses where the organisation is heading and then asks: what skills do we need to succeed?
- Run the definition as a facilitated process in Skillhive. A large workshop is difficult: in a group of more than five, interaction becomes harder, and flip chart lists easily remain disconnected. In Skillhive's guided discussion, everyone takes part during a week whenever it suits them. Management and key people spend at most an hour.
- Structure the skills. Decide the grouping logic: for example, strategic and shared skills as areas of expertise, and team- and role-specific detailed skills as mappings. The first draft is often easiest to make in a spreadsheet.
- Test and pilot. Bring the skills into Skillhive. The planner tests first, then key people and a pilot group. Collect feedback and adjust.
- Roll out. Invite the rest. Show examples: when one team tries it and leads the way, others join more easily.
Give teams ownership
When management and HR define the strategic skills, teams can run their own more detailed mappings in addition. They are supported with a template and guidance. A team's own mapping does not break the shared areas of expertise, and it can be restricted to be visible only to the team. This way the team sees together what its goals require, what is missing and where development should be focused. Ownership brings responsibility and engagement.
HR still has a role: it facilitates, supports, encourages and leads by example. The difference from the old model is that HR does not decide everything alone from the top.
To consider: visibility
Skillhive is built on an open model in which skills are made visible within the organisation, and most customers use it this way. Sometimes there are good reasons to restrict visibility. Individual skills cannot be hidden, so more sensitive expertise is best handled with certificates or in restricted development discussions. Decide on visibility before rollout, and pilot if the matter concerns you.
Need help?
Intunex supports the planning and rollout of skills mappings with ready-made models, and together a strategic mapping has typically been completed in 2–4 weeks. Skillhive customers receive support and peer learning meetings where customers exchange experiences. Get in touch through the skillhive.com/osaamiskartoitus page or at info@intunex.fi.
Swarms
In Skillhive, all content views are called Swarms. A Swarm is a shared collaboration space where people work around a common goal. The concept reflects collective intelligence – enabling skills to be shared and combined across teams and organizational boundaries.
What is a Swarm?
Technically, a Swarm is a page view with features depending on its swarm type.
Swarms can be used for:
- Project teams
- Development discussions
- Training programs and learning content
- Onboarding
- Goals
- Expert searches
- Competency assessments
- Discussions
- Events
All content in Skillhive is structured as swarms.
Swarm Structure
All swarms include:
- Title
- Description
- Linked skills (tags)
- Discussion area
Depending on the swarm type, additional features may include:
- Goals
- Task lists
- File sharing
- Link sections
- Events
Ownership and Membership
Each swarm has at least one Primary Owner.
- The creator of the swarm is the default primary owner.
- The primary owner can assign additional owners.
- Ownership can be transferred.
Owners can:
- Edit swarm details
- Manage visibility
- Manage members
Swarms may include:
- Owners
- Members
- Followers (receive notifications without being members)
Swarm Visibility
A swarm can be:
Open
- Visible to all organization users
- Anyone can join
- Anyone can invite others
Restricted
- Visible only to owners, members, and invited users
- Joining by invitation only
- Only owners can invite
Admins may also directly add users to swarms.
Official Content
Official or administratively created swarms can be marked with a visual badge to distinguish them from user-generated content.
Swarm types
Types of swarms
All content types in Skillhive are implemented as swarm types.
Examples of swarm types include:
- Event
- Idea
- Question
- Project
- Discussion
- Learning Content / Training
- Goal
- Onboarding
- Expert Search
- Announcement
- Competency Assessment
- Area of Expertise
- Certification
Swarm type names can be customized per organization.
Admins define:
- Which swarm types are enabled
- Which user roles can create each type
If a swarm type is enabled, its main view appears in navigation for all users.
However, only users with creation rights can create new swarms of that type.
Example:
- Only HRD users may be allowed to create training swarms
- Admin rights are not required for that purpose
Swarm visibility
Swarm owners can define the visibility of a swarm. Three visibility options are available.
1. Open
An Open swarm:
- Is visible and searchable by all users within the organization
- Includes EXT users
- Displays a visual information banner below the header image stating:
- “Visible to all”
In an Open swarm:
- Any Regular User can invite other users
- Users can join without approval
2. Internal (Default)
An Internal swarm:
- Is visible to all Regular Users
- Is visible to EXT users only if invited
- Is not publicly visible outside the organization
Any Regular User can invite other users to an Internal swarm.
Internal visibility is the default setting for new swarms.
3. Invite Only
An Invite Only swarm:
- Is visible only to owners, members, and invited users
- Does not appear in search results or swarm listings for others
The swarm page displays:
- A lock icon
- The text: “Visible to invited experts only”
A lock icon is also shown in swarm listings (e.g., on the homepage).
Invitations to Invite Only swarms can be sent by:
- Swarm owners
- Admins (if members of the swarm)
Users can join only by invitation.
Changing Visibility
Swarm visibility can be changed by:
- Swarm owners
- Admins
The change is made from the swarm page under:
Edit Swarm Details
Please note:
- Visibility cannot be changed if the swarm contains comments
- Comments must be removed before visibility can be modified
Users can delete only their own comments.
Admins can delete any comments.
Swarm owners and members
Each swarm has at least one Primary Owner and may have additional Co-owners. The creator of a swarm automatically becomes the Primary Owner. Owners have extended management rights compared to regular members.
Owner Permissions
Owners can:
- Edit swarm title, description, and details
- Manage linked content
- Edit goals and task lists
- Define swarm visibility
- Invite members (including to restricted swarms)
- Download swarm reports
Owner vs Member
An owner does not need to be a member.
- If the owner is also a member, they appear in member reports.
- If they remove themselves as a member, ownership remains, but they are excluded from member lists and reports.
This is useful in HR-related swarms where only employees should appear in reports.
Managing Owners
Inviting an Owner
Owners can invite another user to become an owner:
- Click Invite Experts
- Select Invite as Owner
The invited user must accept the invitation.
Direct Owner Assignment (Admin)
Admins can assign owners directly from the owner management view.
- No acceptance required
- Admins may also transfer primary ownership
Swarm Members
Users who join a swarm are referred to as:
- Members
- Experts
- Participants (in training swarms)
Members are listed in the swarm.
Joining and Inviting Members
Joining
- Open swarms → free to join
- Internal or Invite-only → invitation required
EXT users:
- Cannot join restricted swarms without invitation
- EXT+ users cannot join swarms as members
Inviting Members
If swarm is:
- Open → any Regular User may invite
- Restricted → only Owners or Admins may invite
Invitation process:
- Click Invite Experts
- Search user by name
- Select Invite to Swarm
Invited users receive:
- Email notification (if enabled)
- In-app notification
Invitation List
Invited users appear in the invitation list until they accept.
After acceptance, they move to the member list.
Direct Member Addition (Admin)
Admins may add members directly using:
- Add to Swarm
No notification is sent.
Revoking an Invitation
If the invited user has not joined:
- Owners or Admins may revoke the invitation
- Once revoked, the user can no longer join using that invitation
Creating a Swarm
Swarms are the core collaboration unit in Skillhive. Creating a swarm defines who participates, what content is included, and how the information is shared. Swarms can be created from scratch or from templates. Managers can also create multiple personal swarms at once (bulk creation).
General
Administrators define, per user role, who is allowed to create which swarm types.
Each swarm has at least one main owner. The creator of the swarm automatically becomes the main owner. The owner can add or remove additional co-owners.
More about ownership:
https://www.skillhive.com/kayttoohjeet?ohje=swarm-owners-and-members
A swarm can be created:
- From a template (see https://www.skillhive.com/kayttoohjeet?ohje=templates
- )
- From scratch ("Create new")
Creating a Swarm from Scratch
Click Create new.
From the menu that opens, you will see the swarm types available for your user role.
(See swarm types: https://www.skillhive.com/kayttoohjeet?ohje=swarm-types
)
Swarm Basic Information (Main View)
In the creation view, the following information is completed:
Basic Information
- Creation mode (visible only to managers, see below)
- Link to learning content (only in Learning Content swarm type)
- Learning content type (only in Learning Content swarm type)
- Title (required)
- Description
- Visibility
- Open
- Internal
- Invite only
- (See details: https://www.skillhive.com/kayttoohjeet?ohje=swarm-visibility
- )
- Linked skills
- Selecting and inviting participants
- Invitations can be sent immediately or after creation
- The system suggests participants based on linked skills
- Users can also be searched by unit, job title, location, or manager
Detailed Settings (Left Panel)
The available fields depend on the swarm type.
LEARNING CONTENT
- Trainers
- Start date (required)
- End date (required)
- Registration and cancellation deadline
- Mark as ongoing
- Duration (hours) (required)
- Course type
- Location
- Participant limit (min / max)
- Price
- Mark as official
- Mark as template
GOALS
- Start date
- (If left empty, defaults to the creation date)
- End date
- Mark as ongoing
- Mark as template
Manager Creation Modes
Managers have two alternative ways to create swarms:
1️⃣ Shared Swarm (default)
One shared swarm for all invited users.
2️⃣ Personal Swarms (bulk creation)
Creates a separate, individual swarm for each selected user.
This is especially useful for:
- Performance and development discussions
- Onboarding processes
- Certification workflows
This feature is available in all swarm types but is visible only to managers.
Other users have access only to the shared swarm creation mode.
Copying a Template for Employees
- Go to the main view of the desired swarm type (e.g., Goals).
- Select the template.
- Click Use this template.
- Choose the creation mode (for managers):
- A) Shared swarm
- B) Personal swarms (bulk creation)
- Select users.
- In bulk creation, only members of your own team can be selected.
- Complete any additional required information.
- Save.
- Invite participants if needed.
Important During Creation
When creating a swarm, visibility can be defined immediately in the creation view.
Especially when creating a swarm from a template, it is important to verify visibility settings before saving, to ensure the swarm does not unintentionally become visible more broadly than intended.
Following a Swarm and a Skill
Following a swarm allows you to stay informed without active participation. Followers receive notifications about activity such as new comments. You can follow a swarm without being a member if it is visible to you. Restricted swarms can only be followed by users who have access rights.
What Does Following a Swarm Mean?
Following a swarm means receiving notifications about activity within that swarm, such as:
- New comments
- New content
- Updates
Following does not require active participation.
It enables users to stay informed.
Notification Settings
Users can define in their personal settings whether they wish to receive email notifications immediately when activity occurs in a swarm.
If the setting is enabled:
- Users automatically follow a swarm when they
- Create a swarm, or
- Join as a member
If the setting is disabled:
- Users may follow individual swarms manually by clicking the Follow button in the swarm action menu
Managing Follow Status
- Users may stop following a swarm at any time
- Users may follow a swarm without being a member
- Provided the swarm is visible to them
Following is a personal setting and does not affect swarm visibility.
Why Following Matters
Following supports passive awareness and organizational learning.
Not all learning happens through active commenting or posting.
Equally important are:
- Observing best practices
- Discovering ideas
- Applying insights to one’s own work
Following enables knowledge to spread where it is intended to spread.
Visibility and Restrictions
Some swarms are intentionally restricted.
- Invite-only or restricted swarms are visible only to authorized users
- Users without visibility cannot follow such swarms
- Not even Admins can follow swarms they do not have access to
This ensures both transparency and confidentiality within the same system.
Following Skills
Users may also follow individual skills.
By clicking Follow on a skill page:
- Users receive notifications when new swarms are linked to that skill
- Users receive notifications when new users add the skill to their profile
Following skills supports awareness of developments within specific competence areas.
Swarm featured images
Why Swarm Images Matter
Swarm images are an essential part of the user experience and serve several purposes:
Attracting attention
Images make content visually engaging and easier to scan.
Enhancing understanding
Visual elements support communication and help users grasp content quickly.
Setting the tone
Images shape the emotional and visual atmosphere of the platform.
Strengthening brand identity
A consistent visual style reinforces organizational identity.
Differentiating content
Images help users distinguish between different types of swarms.
Improving overall design quality
Well-designed visuals make the platform feel professional and cohesive.
Image Size and Cropping
Swarm images are responsive and adapt to screen size. While there is no single fixed pixel size recommendation, the following principles apply.
1. Swarm Card (List View)
Always cropped horizontally.
Cropping is centered.
Width: 360 px (or less on narrow screens).
Minimum height: approx. 125 px.
Height may increase if title wraps to multiple lines.
Bottom ~55 px reserved for overlay text.
A dark gradient improves text readability.
On wider screens, multiple cards are displayed side by side rather than increasing image size.
2. Swarm Page (Header Image)
Height: 50% of screen height.
Width: Full screen (or up to main navigation edge).
Cropping is centered.
Bottom overlay includes action buttons:
One row ≈ 50 px
Two rows ≈ 90 px
Orientation and Cropping Behavior
Landscape view → horizontal crop
Portrait view → vertical crop
Depending on screen ratio, significant parts of the image edges may be cropped.
When selecting images:
Keep the focal point centered
Avoid critical elements near edges
Avoid placing text near image boundaries
Images work best when they do not rely on one small edge detail.
Ready to use
These example images were created with ChatGPT and are free for Skillhive customers to use in their own Skillhive environment. You can download them and use them as they are, or use them as inspiration for creating your own visual style.
No attribution required.
Deleting and archiving a swarm
How to delete and archiving a swarm?
Deleting a Swarm
A swarm can be deleted by:
- The swarm owner (if they created the swarm)
- An Admin
Deletion is possible only if the swarm contains no comments.
The Delete button is located in the swarm action menu and is visible only to users with deletion rights (owners and Admins).
Deletion Restrictions
- If the swarm contains comments, deletion is disabled.
- All comments must be removed before deletion.
Regular users can delete only their own comments.
Admins can delete all comments.
If an Admin Does Not Have Access
If an Admin does not have visibility into a restricted swarm, deletion requires contacting Skillhive support through the designated organizational contact person.
Archiving a Swarm
In most cases, deletion is not necessary.
A swarm can instead be marked as Completed, which:
- Removes it from active listings (e.g., homepage)
- Moves it to the archive of completed swarms
Archiving preserves all content for future reference.
Marking a Swarm as Completed
A swarm can be marked as completed by:
- Clicking the In Progress status link
- Setting an end date for the swarm
If an end date is defined, the swarm is automatically archived once the date is reached.
Recommendation
Archiving is generally recommended over deletion because:
- Past projects and discussions may be valuable later
- Lessons learned and outcomes can be documented
- Knowledge is preserved
Archiving supports long-term organizational learning.
Templates
What is a Template?
A template is a predefined swarm that can be used as a starting point when creating a new swarm.
Templates help create consistent structures for example in:
- Competency assessments
- Onboarding processes
- Performance and development discussions
- Projects
- Learning programs
Templates speed up work and ensure that content follows the organization’s agreed practices.
Note: Templates cannot be created for Competency Areas.
Where Are Templates Visible?
Templates are listed at the top of each swarm type’s main view.
They are visible only to users:
- Who have permission to create that swarm type
- Whose access level allows them to see the template
If a user does not have permission to create a specific swarm type (e.g., certifications), they will not see its templates.
Template Visibility
Templates have their own visibility settings.
They can be:
- Open to all users with permission to create that swarm type
- Restricted to specific users or roles (e.g., managers only)
For example, if a performance discussion template should only be visible to managers:
- Managers must be added or invited as members or owners of the template swarm
- The template visibility must be set to restricted
Template owners can manage:
- Title
- Description
- Owners
- Visibility
- Content
from the edit view (pencil icon).
Using a Template
To create a new swarm from a template, click:
“Use this template”
When a new swarm is created from a template, the following elements are copied:
- Title (prefixed automatically with “Copy:”)
- Description
- Background image
- Pinned comments
- Task lists
- Links
- Linked skills
- Participation approval requirement (if defined)
The template creates a new, independent swarm.
The creator of the new swarm becomes its owner.
Default Visibility of a New Swarm
By default, a swarm created from a template is:
Restricted (invitation-only).
The creator can change the visibility during creation or later, as long as the swarm contains no comments.
⚠️ User Responsibility
Important:
Even if the original template is restricted (for example, a performance discussion template), the visibility of the copied swarm can be changed.
This means the creator must:
- Verify visibility settings before starting work
- Ensure confidential content remains restricted
- Follow the organization’s data protection and confidentiality policies
Templates support structured processes — but the responsibility for correct visibility settings lies with the swarm creator.
Governance Perspective
Templates are an organizational governance tool.
They enable:
- Consistent processes
- Quality assurance
- Structured learning
At the same time, they preserve flexibility, allowing users to adapt the copied swarm to their needs.
This balances control and agility — providing a clear starting point without locking users into rigid structures.
Discussions and commenting
Discussions and commenting
Each swarm (content page) includes a dedicated Discussion tab.
Commenting is possible at two levels:
- Top-level comments
- Replies (sub-comments under a top-level comment)
Ordering Logic
- The newest top-level comment appears at the top.
- Replies are shown under their parent comment, with the newest reply at the bottom.
Discussion Features
📌 Pinning Comments
Swarm owners can pin top-level comments.
- Pinned comments remain at the top of the discussion even when new comments are added.
- If multiple comments are pinned, the most recently pinned comment appears first.
- Pinning can be removed by clicking the Pin button again.
- The order of pinned comments can be changed by unpinning and re-pinning them in the desired order.
- Pinned comments are copied when a swarm is created from a template.
- Pinned comments are visually highlighted with a distinct border.
Pinned comments are particularly useful in templates to provide predefined discussion prompts or instructions.
👍 Liking Comments
- Users can like comments.
- The number of likes is displayed next to the Like button.
📎 Attachments and Media
- Attachments can be added to comments.
- Attached images open in a preview view.
- YouTube videos are displayed as embedded content within the comment.
✏ Editing and Deleting Comments
- Users can edit and delete their own comments.
- Administrators can edit and delete any user’s comments.
When a comment is edited:
- An “edited” indicator is shown next to the comment.
- Additional details can be opened to view the edit history, including:
- Who edited the comment
- When the edit was made
Only the original author and administrators can edit a comment.
🔔 Notifications
Notifications are sent for new comments and likes to:
- Swarm members
- Swarm followers
Receiving notifications depends on each user’s personal notification settings.
🔐 Visibility and Data Protection
- Comments are visible only to users who have access to the swarm.
- If a swarm is restricted, comments cannot be seen or followed by users outside that group.
⚠️ The discussion section is not intended for processing sensitive personal data without a specific and valid legal basis.
Task lists
The task list functionality enables structured tracking of agreed tasks within swarms. It supports operational transparency and management while maintaining role-based access control and data minimization principles.
Task lists allow teams to manage, track, and report the completion and progress of agreed tasks.
Using templates, ready-made task lists can be created for:
- onboarding processes
- training programs
- performance and development discussions
When a new swarm is created from a template, the task lists are automatically copied into the new swarm. After copying, task lists and individual tasks can be edited, added, or removed as needed.
Task List Types
There are three types of task lists available:
1. Shared Tasks
- Any swarm member can mark the task as completed.
- The task is completed once for the entire swarm.
2. Individual Completion Tasks
- Each member marks the task as completed for themselves.
- The interface shows which members have completed the task.
- Suitable for onboarding and learning activities.
3. Owner-Only Tasks
- Visible only to swarm owners and administrators.
- Suitable for approvals or supervisory checks.
- For example, a manager’s approval can be defined as a task in this category.
Editing Task Lists and Tasks
- Each swarm member can mark tasks as completed for themselves.
- Users can edit and delete task lists and tasks they have created.
- Swarm owners and administrators can edit all task lists within the swarm.
- Editing is done via the pencil icon.
The same permission principles apply to goals on the Goals tab.
Reporting
Task list data can be exported as reports:
- A swarm owner can download the swarm’s task list data as an Excel/CSV file.
- A manager can download task list data from their team members’ goal swarms.
- An administrator can download statistical/quantitative data (e.g., number of tasks and completion counts) from all goal swarms, but not detailed task descriptions.
Training applications
The Learning Content functionality in Skillhive supports:
- training and course management
- training calendar
- approval workflows
- application handling
- reporting
1. Training Events in Skillhive
If a training event is configured with:
“Manager approval required”
Applying
- Click Apply
- Add optional justification
- The application is forwarded to the manager
2. Manager Processing (My Team View)
Managers process applications via:
My Team → Training Applications
The application displays:
- Training name
- Date and duration (hours)
- Description
- Location
- Participant limits (min–max)
- Cost
- Submission timestamp
Managers can:
- Approve
- Reject
Users receive a notification once processed.
3. Applying to External Training
A Training Application Template can be used to apply for external courses.
Creating from Template
- Select the training application template.
- Click Use this template.
- Edit title (add course name).
- Fill required details:
- Organizer
- Dates
- Duration
- Location
- Cost
- Add additional description.
- Attach program (Files) or link (Links).
- Submit via Apply.
When approved:
- Training data is automatically added to the user profile.
- Included in training reports.
4. Cancelling Participation
Approved participants may cancel:
- Via Participating / Applied button
- Unless cancellation restrictions are configured
Users must cancel participation in Skillhive to ensure reporting accuracy.
5. Special Notes
Visibility
- Template-based applications are restricted (invite-only) by default.
- Managers and administrators still receive applications for approval.
Applications created via Create New:
- Are visible to regular users by default.
- Do not automatically add managers as members.
- Managers receive an approval link only.
Multiple Applicants
One application swarm can include multiple applicants by adding them as members.
Notifications
Skillhive Notifications
All user-related notifications are displayed in the Notifications view within the service.
Notifications are generated, for example, when:
- You are invited to a swarm
- Someone comments in a swarm you are a member of
- Someone replies to your comment
- Someone likes your comment
- Someone recommends your skill
- Your application (e.g. training request) is processed
Notifications are always visible in the system regardless of email notification settings.
Personal Notification Settings
You can manage your settings via:
Settings → Notifications
You can define:
- Which events trigger email notifications
- Whether you want notifications when:
- You are invited to a swarm
- Someone comments in a swarm you are a member of
- Someone replies to your comment
- Notification preferences by swarm type
If you do not want email notifications, simply uncheck the relevant option.
Swarm and Skill Following
Regardless of general settings, you can:
- Follow an individual swarm via the Follow button
- Follow a specific skill from the skill page
Following ensures you receive notifications related to that specific swarm or skill.
Email Summary Frequency
You can define how often you receive email summaries:
- Daily
- Weekly
- Never
Email summaries consolidate multiple notifications into one message.
Browser Notifications
You can allow Skillhive to display browser notifications.
Browser notifications require:
- Being logged into the service
- Granting browser permission for notifications
Reports and analytics
Skillhive provides reporting and analytics tools to support competency management, transparency, and data-driven decision-making.
1. Platform Usage Statistics (Admin)
Administrators have access to platform analytics via the admin view.
Usage statistics include:
- Daily user counts
- Active users
- Activity volume
- Number of skill assessments
- Number of created swarms (e.g., discussions, projects, trainings)
- Number of comments
- Number of recommendations
These metrics provide an overview of platform engagement and activity levels.
2. Administrator Reports
Administrators can download comprehensive tabular reports of system data.
Reports are available in CSV format for further analysis.
A preview view is available before downloading the full report.
Report scope depends on user role and permissions.
3. Manager Reports
Managers can download reports related to their direct reports.
Reports are available via:
My Team view
Manager-level reports may include:
- Profile information
- Skill assessments
- Goals
- Task completion status
- Training data
Reports are downloadable in CSV format.
4. Competency Visualization
Skill and interest data can be analyzed using a visual quadrant tool.
The visualization uses:
- X-axis = Interest level
- Y-axis = Skill level
Each skill appears as a bubble:
- Bubble size = number of users
- Bubble position = average skill & interest level
Clicking a bubble shows:
- Distribution of individual assessments
- User positioning within the quadrant
The visualization tool is available:
- On the Experts page → Charts
- On each swarm’s Charts tab
5. Access Rights
Skill search and visualization are available to:
- Regular users
- Administrators
Not available to:
- EXT and EXT+ users
What Analytics Does NOT Do
Skillhive analytics is designed to support learning and competence management — not surveillance.
The following information is never shown in manager or administrator reports:
❌ Full discussion threads or detailed discussion content
❌ Content from restricted swarms without proper access rights
❌ Behavioral or browsing activity tracking
Skillhive does not provide:
🚫 Individual productivity scoring
🚫 Automated employee ranking
🚫 Hidden monitoring mechanis
Leaderboard and gamification
Skillhive includes a lightweight community recognition system designed to encourage collaboration, knowledge sharing, and active participation. The purpose is to make collaborative activity visible and support swarm culture.
Inspirer Points
Users earn Inspirer points when they:
- Create content (ideas, projects, discussions)
- Attract others to join their swarm
- Spark engagement and discussion
The more participation and activity a swarm generates, the more points its creator receives.
Contributor Points
Users earn Contributor points when they:
- Join swarms
- Participate in discussions
- Share expertise
- Receive recognition or recommendations related to their skills
Contributor points reward helping behavior and knowledge sharing.
Leaderboards
Leaderboards display users who have accumulated the most:
- Inspirer points
- Contributor points
During the past 30 days.
Rankings are time-based (rolling 30-day window), not lifetime accumulations.
Awards
Depending on settings, users may receive visual badges (Awards) on their profile as their points increase.
- Early milestones are easier to achieve.
- Higher-level awards require more sustained contribution.
Awards recognize active community participation, not performance ranking.
Administration
Administrators can enable or disable the recognition system from the admin view.
Lost password
What should I do if I forget my password?
AD / Entra ID Login
If you log in using AD or Entra ID:
- You do not have a separate Skillhive password
- Password management is handled in your organization’s identity system
Skillhive Username & Password
If you use a Skillhive-specific login and have forgotten your password, you can reset it.
Resetting Your Password
- On the login page, click:
- “Forgot your password? Click here to reset it.”
- Enter your username (email address).
- You will receive an email with a password reset link.
- (If you do not see the email, check your spam folder.)
- Follow the link to create a new password.
Changing Password While Logged In
You can also change your password via:
Settings → Change Password
Creating a Strong Password
Follow national cybersecurity guidance (e.g., Finnish Cyber Security Centre) for strong password practices:
- Use long and unique passwords
- Avoid reusing passwords across services
- Consider using a password manager
Changing your email address
How do I change my email address?
Changing your email address depends on your organization’s settings.
1. Organization Settings
The administrator defines:
- Whether email changes are allowed
- Whether the new address must belong to the same domain
- Or whether other domains are permitted
2. Who Can Change It?
If changes are allowed:
- Users can change their own email address
- Administrators cannot change other users’ email addresses
3. How to Change It
Go to:
Settings → Change Password
After entering a new email address:
- A confirmation request is sent to the new address
- The change becomes effective after confirmation
4. Special Cases
If a user no longer has access to their previous email address:
- The administrator may contact Skillhive support to request a change
5. AD / Entra ID Login
If Skillhive uses AD / Entra ID authentication:
- The email address is sourced from the directory
- It cannot be changed within Skillhive
- Changes must be made in the organization’s identity management system
Mobile interface
Does Skillhive have a mobile app?
Skillhive works in all major web browsers without requiring additional plugins. Supported browsers include:
- Microsoft Edge
- Google Chrome
- Mozilla Firefox
- Safari
The service supports at least the two most recent versions of these browsers.
Skillhive is fully responsive and scalable, working seamlessly on large screens as well as mobile devices.
There is no separate native mobile application for Skillhive.
Verified experts
Administrators can mark a user as a Verified Expert for a specific skill.
Verified experts:
- Are displayed at the top of the expert list on the skill page
- Gain increased visibility for their content related to that skill (e.g., discussions, projects, ideas)
- Are recognized as trusted internal experts within the organization
Verification is not based on automated scoring, but on administrative discretion. Its purpose is to make trusted expertise easier to find and to strengthen visibility of key competencies within the organization.
Official marking
Certificates
The Certificates feature is used to manage internal and external qualifications and competence credentials.
Creating a New Certificate
Administrators define in Swarm settings which user roles are allowed to create certificates.
Typically, creation rights are restricted to administrators.
A new certificate can be created:
- Using Create New
- By copying an existing template
Marking a Certificate as Official
- Only administrators can mark a certificate as official.
- An official certificate can only be added to a user by:
- the certificate owner, or
- an administrator.
Adding a Certificate to a User
Regular users can add open (public or internal) certificates to their own profile:
- Click Add to my certificates
- Define validity start and end dates
If no dates are modified:
- The start date defaults to the moment of addition
- The end date remains empty (valid until further notice)
Administrators can add certificates to other users and define validity dates.
Inviting Users to a Certificate
Administrators and certificate owners can:
- Send invitations to users
- Invited users can add the certificate to their profile
- Validity dates are defined during the addition process
Checking Validity Information
Validity dates can be reviewed:
- On the certificate page
- From the Experts list
- By opening detailed user information
Editing Validity Information
Administrators and certificate owners can edit validity dates for certificate members.
Searching by Certificate
On the Experts page, users can search by certificate.
The search shows:
- Users who have added the certificate to their profile
Currently, the search does not distinguish:
- Whether the certificate is valid or expired
Reports
Current certificate reports show:
- The date when the certificate was added
Validity status is not yet included in reports.
🔄 Upcoming Improvements
The following enhancements are on the roadmap:
- Expiring certificate indicators in reports
- Notifications for expiring certificates
- Clear validity status (Valid / Expired) displayed on:
- Profile pages
- Expert search results
Deleting user data
Deleting user data (disabling and anonymizing)
How are user profiles and personal data removed?
Administrators can remove user access and profiles via the admin panel.
User data removal is performed in two phases:
- Deactivation
- Anonymization
1️⃣ Deactivation
Deactivation moves the user profile to an inactive state.
- The user can no longer log in
- The profile is no longer active in the organization
- Data remains stored in the database
- The profile can be reactivated if needed
Deactivation is suitable for situations such as:
- employee leaving the organization
- temporary suspension
- legal or business-related retention requirements
2️⃣ Anonymization
Anonymization permanently removes personal data.
- Personal profile data is deleted from the database
- Data cannot be restored
- The process is irreversible
Anonymization does not remove:
- swarms created by the user
- comments written by the user
- files uploaded by the user
Content remains in the system but is no longer linked to an identifiable individual.
Automatic Deactivation (AD Integration)
When Azure AD / Entra ID integration is enabled, automatic deactivation can be activated.
Skillhive will:
- check once per week whether the user’s AD account is still valid
- automatically deactivate the profile if the account is no longer active
Automatic Anonymization (Under Development)
Automatic anonymization is not currently available.
This feature is under development.
When implemented, organizations will be able to define:
- a retention period after which deactivated users are automatically anonymized.
Automatic Deactivation and Anonymization
Skillhive supports both automated and manual user lifecycle management.
1. Automatic Deactivation (AD/Entra Integration)
When AD/Entra integration is enabled:
- Skillhive periodically checks whether the user account is still active in AD
- If not, the user profile is automatically deactivated
- Deactivated users cannot log in
2. Automatic Anonymization
Organizations can define a retention period for deactivated users
(e.g., anonymize 2 years after deactivation).
After anonymization:
- Personal data is permanently removed
- The profile cannot be restored
- User-generated content remains without personal identifiers
This enables a fully automated lifecycle:
Deactivation → Retention → Anonymization.
What do I do if I need help?
How to Get Support?
If you experience issues when using Skillhive:
- First, check these user instructions.
- Most common questions are covered here.
- Contact your organization’s main admin or designated contact person.
- They can assist with access rights, settings, and organization-specific practices.
- If you do not know who your admin is, or the issue is not resolved,
- you can contact the Skillhive support team at:
- info@intunex.fi
Support is primarily provided through designated contact persons, but we respond to all messages and guide inquiries to the appropriate party when needed.
We are happy to help.
Feedback and development ideas are always welcome.